

Changing your WordPress domain name can be a big move — one that comes with both benefits and potential drawbacks. If your site already has traffic, rankings, and loyal visitors, it’s important to plan carefully before making the switch.
That said, there are plenty of legitimate reasons to update your domain, and when done properly, the process is straightforward.
In this guide, we’ll walk you through how to safely change your WordPress site’s domain name and share key tips to ensure a smooth transition without disrupting your SEO or user experience.
Why Change Your Domain Name?
There are several reasons you might decide to update your domain. Here are some of the most common:
1. You’ve changed your business name.
If your company has gone through a rebrand, merger, or name change, your domain should reflect that. Keeping your web address consistent with your new business name makes it easier for customers to find and trust you.
2. You’re rebranding for a fresh image.
A new domain can help you reposition your brand, target a new audience, or better align with your company’s evolving vision. It’s a strategic move that can also enhance your marketing and brand identity.
3. You want a better domain extension.
Sometimes, you might simply want to move from one extension to another—like upgrading from .org to .com to build credibility or switching to a niche TLD (like .tech or .agency) that better fits your business.
Changing your WordPress URL is simple — it only takes a few steps within your WordPress settings and hosting panel. But doing it the right way ensures you don’t lose traffic, SEO rankings, or data.
Do You Need to Buy a New Domain Name?
Yes — before moving your WordPress site to a new domain, you’ll need to purchase and register that new domain name. While it sounds simple, finding the perfect domain can take some time and strategy.
Start by reserving your new domain through a trusted registrar. Most domains cost less than $20 per year, but the real challenge lies in finding a name that’s available, memorable, and aligns with your brand identity.
If your existing domain is still under contract, you might end up managing two domains temporarily — and that’s perfectly fine. In fact, we recommend keeping your old domain active for at least six months after switching. This allows you to set up a 301 redirect from your old domain to your new one, ensuring visitors and search engines are properly guided to your updated site.
Once traffic has fully transitioned and your SEO rankings have stabilized, you can safely cancel your old domain registration.
Don’t forget to update your new URL everywhere it appears — from your social media profiles and email signatures to marketing materials, business cards, and directory listings. Consistency helps maintain trust and brand recognition.
How to Change Your Domain Name in WordPress
Changing your primary WordPress domain name isn’t complicated, but it’s a task that should be done carefully to avoid downtime or configuration errors.
Here’s a quick overview of the process:
- Update your site URL in WordPress
- Go to your WordPress Dashboard → Settings → General and update both the WordPress Address (URL) and Site Address (URL) fields with your new domain.
- Update your
wp-config.phpfile - Add or modify the following lines to ensure your new domain is correctly defined:
define('WP_HOME', 'https://yournewdomain.com');
define('WP_SITEURL', 'https://yournewdomain.com');
- Verify your changes
- Visit your new domain and confirm that your site loads correctly. Check that internal links, images, and redirects are all working as expected.
If you’re managing your sites with Pivotlar, you can perform this domain change seamlessly through your site dashboard. Pivotlar automatically handles your WordPress URL update, SSL configuration, and Nginx redirect setup — no manual edits required.
How to Change Your Domain Name in WordPress
Now that you’ve taken care of the preparation, it’s time to make the actual switch. Changing your domain name in WordPress involves just a few steps — but it’s important to follow them in the right order to avoid downtime or losing access to your dashboard.
Step 1: Update Your URL Inside WordPress
The first step is to update your site’s URL directly from your WordPress settings.
⚠️ Important: Once you change your URL here and save, your WordPress admin area will temporarily become inaccessible until the rest of the steps are completed — so proceed carefully.
Here’s how to do it:
- Log in to your WordPress dashboard.
- Navigate to Settings → General.
- Update both the WordPress Address (URL) and Site Address (URL) fields with your new domain name.
- Click Save Changes.
At this point, WordPress will start referencing your new domain, but you’ll still need to complete a few additional steps to ensure everything loads properly.
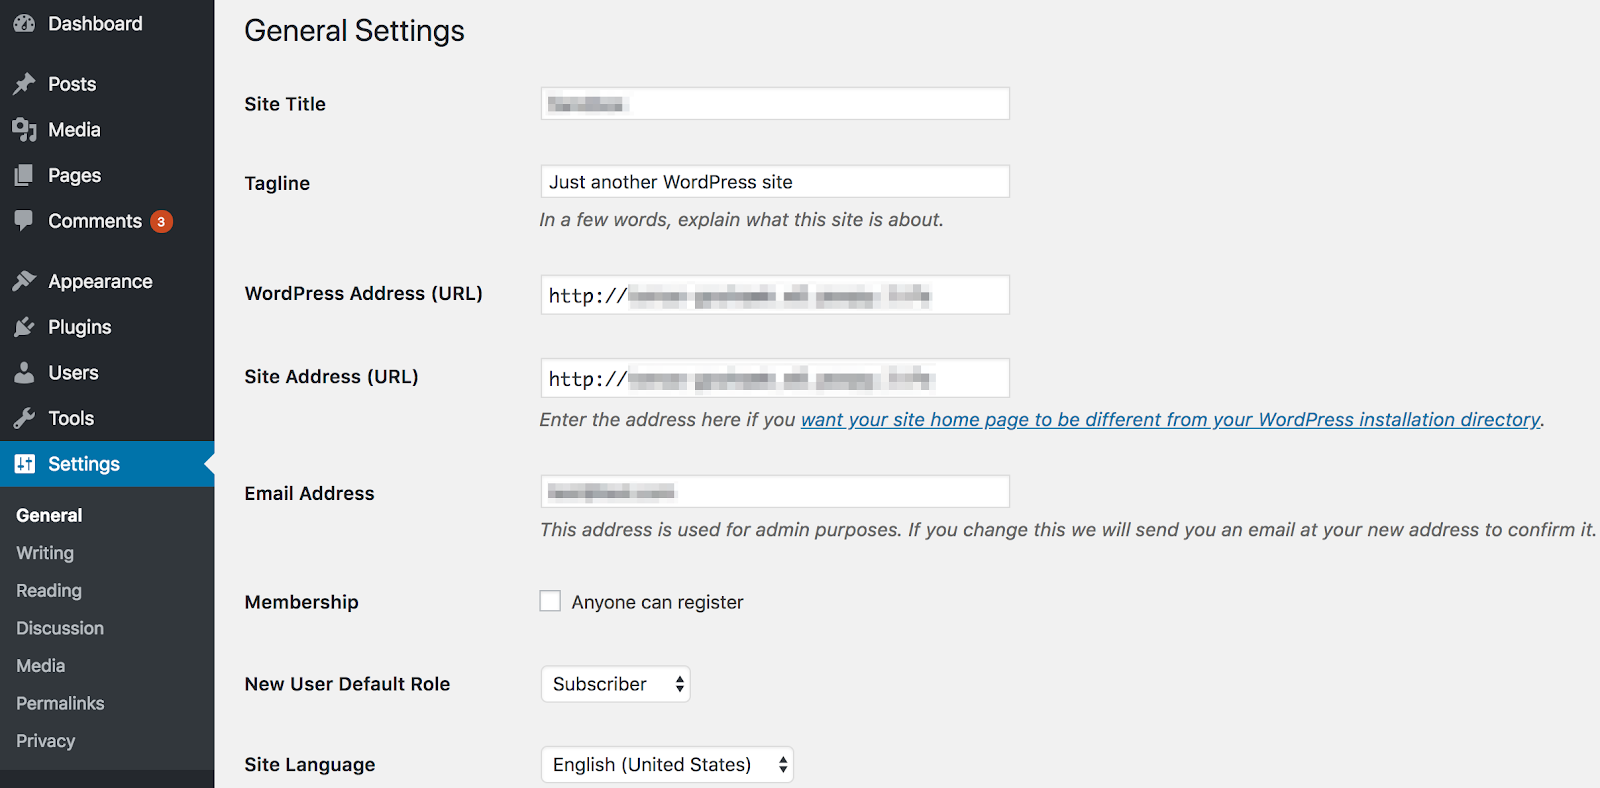
This screen contains global settings for your WordPress site. The fields we’re interested in are WordPress Address (URL) and Site Address (URL):

For a WordPress change URL, simply type the new address into both of these fields, and click on Save Changes. As we mentioned, this will make your site temporarily inaccessible.
Step 2: Set Up Permanent Redirects and Notify Search Engines
Once your new domain is live, the next step is to make sure everyone — visitors, search engines, and links across the web — can find it. This step ties everything together and ensures your traffic, SEO rankings, and backlinks safely transition to your new address.
Set Up Permanent Redirects (301 Redirects)
Even after changing your domain, other sites (and search engines) will still reference your old one. To prevent 404 errors and maintain SEO authority, you’ll want to set up 301 redirects — these tell browsers and search engines that your pages have permanently moved.
Here’s how to do it:
- Access your site’s files via FTP or SSH.
- Locate your .htaccess file in the root directory of your old domain.
- Make a backup copy of it before making any edits.
- Add the following code (and replace the example domain with your new one):
#Options +FollowSymLinks
RewriteEngine on
RewriteRule ^(.*)$ https://www.newdomain.com/$1 [R=301,L]
This ensures that anyone visiting your old URLs will be automatically redirected to your new domain.
Tell Google About the Change
After your redirects are in place, you’ll need to notify Google that you’ve updated your domain.
- Go to Google Search Console.
- Add and verify your new domain property.
- Use the Change of Address tool to inform Google about the domain migration.
This helps preserve your SEO performance and ensures that Google starts indexing your new URLs as quickly as possible.
Optional: Update URLs Directly in the Database (via phpMyAdmin)
If you can’t access your WordPress dashboard or need to fix incorrect URLs, you can update your domain directly in the database.
- Backup your database first — this step is critical.
- Log into phpMyAdmin from your hosting panel.
- Open your WordPress database and select the
wp_optionstable. - Find the rows named
siteurlandhome, then replace their values with your new domain (e.g.,https://www.newdomain.com). - Save your changes and test your site.
⚠️ Note: Updating the database manually doesn’t automatically change URLs inside posts, images, or theme settings. To fix those, use a plugin like Better Search Replace, which safely updates URLs without breaking serialized data.
Optional: Change the Domain Using WP-CLI
If you’re comfortable with the command line, WP-CLI offers a fast and reliable way to update your WordPress domain:
# Update site and home URLs
wp option update siteurl 'https://www.newdomain.com'
wp option update home 'https://www.newdomain.com'

# Update all URLs throughout the database
wp search-replace 'https://www.olddomain.com' 'https://www.newdomain.com' --all-tables-with-prefix --report-changed-only
You can run a dry run first to preview changes safely:
wp search-replace 'https://www.olddomain.com' 'https://www.newdomain.com' --dry-run
Then flush caches to make the changes live:
wp cache flush
WP-CLI is ideal for developers and advanced users managing multiple sites — it’s fast, safe for serialized data, and easily scriptable for automation.
Post-Migration SEO Checklist & Redirect Best Practices
Once you’ve successfully switched your WordPress site to a new domain, your work isn’t quite done. To protect your SEO rankings, maintain site authority, and ensure a smooth transition for users, you’ll want to go through this post-migration checklist.
These steps will help search engines recognize your new domain quickly — and preserve all the SEO value you’ve built over time.
1. Implement 301 Redirects (Absolutely Essential)
Permanent 301 redirects are the backbone of any domain migration. They signal to search engines that your content has permanently moved, ensuring that ranking power and backlinks transfer to your new domain.
You can create redirects:
- Via your server’s .htaccess file (as shown earlier), or
- Using a plugin like Redirection if you prefer a WordPress-based approach.
✅ Make sure to:
- Set up site-wide redirects (old domain → new domain).
- Add page-specific redirects if your URL structure has changed.
2. Update and Submit Your XML Sitemap
Your sitemap helps search engines understand your site’s structure. After changing your domain:
- Generate a new XML sitemap with your updated URLs.
- Submit it to Google Search Console and Bing Webmaster Tools.
If you’re using Yoast SEO, Rank Math, or similar plugins, your sitemap will automatically refresh once you update your site’s URL in WordPress settings.
3. Use the Google Search Console “Change of Address” Tool
This is a critical step many site owners overlook.
- Add your new domain as a new property in Google Search Console.
- In your old domain’s property, go to Settings → Change of Address.
- Follow the prompts to notify Google about your new domain.
This helps Google reindex your site faster and maintain your existing SEO signals.
4. Verify Canonical Tags
Your canonical tags (rel="canonical") tell search engines which version of a page is the “official” one. After the migration:
- Check that all canonical URLs now point to your new domain.
- Most SEO plugins update these automatically, but it’s worth verifying manually on a few pages.
5. Update Your robots.txt File
If your robots.txt file includes absolute URLs (like your sitemap location), make sure those references point to your new domain.
Example:
Sitemap: https://www.newdomain.com/sitemap_index.xml
This ensures search engines can correctly locate and crawl your updated sitemap.
6. Refresh Important Backlinks
301 redirects transfer link authority, but when possible, manually update backlinks from:
- Social profiles (Twitter, LinkedIn, YouTube, etc.)
- Guest posts or articles you control
- Partner websites and directories
Contact webmasters for high-value links — especially if they drive referral traffic.
7. Monitor Your Migration Closely
After going live with your new domain:
- Monitor Google Search Console for crawl errors or 404s.
- Watch indexing progress and fix any missing pages.
- Track organic traffic and keyword rankings using Google Analytics or Ahrefs.
If you notice any sudden drops, investigate redirect chains, sitemap accuracy, and canonical inconsistencies.
8. Update Third-Party Integrations
Don’t forget to update your domain anywhere it’s used externally:
- Google Analytics & Tag Manager
- Email marketing tools (e.g., Mailchimp, ConvertKit)
- Advertising platforms (e.g., Google Ads, Meta Ads)
- Payment gateways and API-based services
Keeping these consistent ensures that data tracking and integrations continue to function seamlessly.